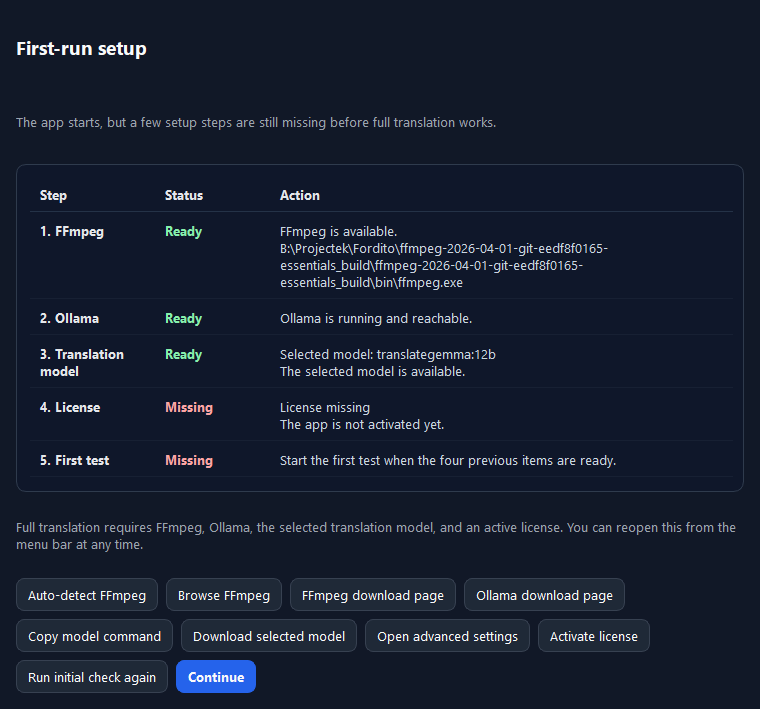
Installation and first run

Detailed setup guide

This page walks through installation, FFmpeg and Ollama setup, model download, and the first successful test. Tutorial videos are a highlighted use case, but the app is not limited to them.

Recommended path Download → setup → short test video → if the workflow works, move to the fixed-price personal license.
What you need

Minimum working set

You do not need a lot, but a few base components must be in place. Once they are ready, the setup assistant can check the whole chain quickly.

  • Windows 10 or Windows 11
  • VoxBridge Studio portable ZIP package
  • FFmpeg
  • Ollama
  • at least one downloaded translation model
  • internet for the initial model download and license activation
Download

Where should you start?

Start on the download page. The portable ZIP package should be extracted into a separate folder, and VoxBridge Studio should be started from that extracted folder.

  • open the download page
  • download the portable ZIP package
  • extract it into a separate folder
  • always start the app from the extracted folder
Featured official downloads
FFmpeg: video and audio processing Ollama: local model runtime Both from official sources

You can run the commands below in PowerShell or cmd. Where there is a difference, it is written explicitly.

Step 1

Install VoxBridge Studio

  1. Open the download page.
  2. Download the portable ZIP package.
  3. Extract it into a separate, easy-to-find folder.
  4. Start VoxBridge Studio from the extracted folder.
  5. Let the first-run setup assistant appear after launch.
VoxBridge Studio first-run setup assistant
First-run check The setup assistant checks FFmpeg, Ollama, the model, the license and the first trial readiness.
Step 2

Install and configure FFmpeg

FFmpeg is required for video and audio processing. If the app cannot find it automatically, you can point the app to it manually.

The featured download button above goes to the official page.

  1. Download an official or trusted Windows build of FFmpeg.
  2. Extract it to a simple path, for example C:\Tools\ffmpeg.
  3. Add the bin folder to PATH, or keep the full path handy.
  4. Verify it in a terminal with ffmpeg -version.
  5. If the app asks for a direct path, choose the same ffmpeg.exe.

Quick check

ffmpeg -version

If this prints a version number, FFmpeg is visible to the system.

If it is not found, either it is not installed or it is not in PATH. Manual path entry inside the app is the quickest fallback.

Step by step in PowerShell

# 1) Create the folder
New-Item -ItemType Directory -Force -Path C:\Tools\ffmpeg

# 2) Extract the FFmpeg package here
# Skip this if you already extracted it

# 3) Check whether ffmpeg.exe exists
Get-ChildItem C:\Tools\ffmpeg -Recurse -Filter ffmpeg.exe

# 4) Add the bin folder to the current session PATH
$env:Path += ";C:\Tools\ffmpeg\bin"

# 5) Verify it
ffmpeg -version
where.exe ffmpeg

The same in cmd

mkdir C:\Tools\ffmpeg
where ffmpeg
set PATH=%PATH%;C:\Tools\ffmpeg\bin
ffmpeg -version

If ffmpeg -version works only in the current terminal, the PATH change is temporary. In that case either set PATH permanently in Windows, or point the app directly to ffmpeg.exe.

Step 3

Install and start Ollama

Ollama runs the local model. For the first setup, a working local Ollama instance is enough as long as the app can reach it.

The featured download button above goes to the official Windows page.

  1. Install Ollama from the official site.
  2. Start the service or the desktop app.
  3. Check the version: ollama --version.
  4. List available models: ollama list.
  5. If no model is present yet, download one in the next step.

Quick check

ollama --version
ollama list

The setup assistant can check this too, but it helps to verify it manually first.

Step by step in PowerShell

# 1) Check the version
ollama --version

# 2) See whether it responds
ollama list

# 3) Start the local service manually if needed
ollama serve

The same in cmd

ollama --version
ollama list
ollama serve

ollama serve is usually only needed if Ollama is not already running. If ollama list works right after install, you often do not need to start it separately.

Step 4

Download the translation model

The default path is based on a local translation model that is easy to understand and run. If the app suggests a different model later, follow that recommendation.

  1. Open a terminal.
  2. Pull the model.
  3. Wait until the download and pull have finished.
  4. Check again with ollama list.
  5. The setup assistant should now show the model as ready.

Recommended models

ollama pull translategemma:12b
ollama pull translategemma:27b

translategemma:12b is the easier and faster starting point. translategemma:27b usually gives better translation quality, but it can be slower and needs a stronger machine with more memory. Start with 12b for the first working setup, then try 27b if translation quality matters more and the machine can handle it.

PowerShell / cmd commands

# Easier starting model
ollama pull translategemma:12b

# Larger, usually better-quality model
ollama pull translategemma:27b

# Verify
ollama list

Quick runtime test

ollama run translategemma:12b "Translate to Hungarian: Hello, this is a short test."

ollama run translategemma:27b "Translate to Hungarian: Hello, this is a short test."

If ollama run returns a sensible translation, the model is really running. The 27b model is listed separately because it usually gives better translation quality.

System requirements

What is needed for a stable start?

MinimumRecommended
Windows 10 or newer
FFmpeg installed
running Ollama
16 GB RAM
SSD storage
Windows 11
32 GB RAM or more
fast SSD
stronger CPU or GPU
stable internet for the initial model download

12b or 27b?

  • `translategemma:12b`: easier start, lower hardware demand, faster first test
  • `translategemma:27b`: usually better translation quality, but slower and more memory-hungry
  • if you are unsure, start with 12b
  • if the machine is stronger and quality matters more, try 27b
Step 5

First-run setup inside the app

  1. Launch VoxBridge Studio.
  2. Open the first-run setup assistant if it does not appear automatically.
  3. Check FFmpeg, Ollama and model status.
  4. Activate the trial or license if you already have it.
  5. Run the first short trial check.

The goal here is not perfection. The goal is the first green status.

What should you verify inside the app?

  1. FFmpeg status is ready.
  2. Ollama is reachable.
  3. The downloaded model is visible.
  4. Trial or license status is green.
  5. The first test can be started.

What should be green?

  • FFmpeg available
  • Ollama running
  • at least one translation model downloaded
  • license or trial status ready
  • the first test can start
Step 6

First successful trial

Start with a short, non-private video, not with an important long course recording. A sidecar subtitle is the easiest first case.

  1. Choose a 1-3 minute clip.
  2. If a sidecar subtitle exists, start with that.
  3. If not, try the audio-to-subtitle path.
  4. Check the language-tagged output, for example VideoName.hu.srt.
  5. Once that works, you are ready for longer material.
VoxBridge Studio files and queue view
Main workflow Files, queue and output are visible in one place, which keeps the first trial easy to follow.
If you get stuck

What should you check first?

  • is FFmpeg actually visible?
  • is Ollama running?
  • is the model downloaded?
  • is the trial or license status green?
  • are you testing with a short, non-private file?

Support export

If it still does not start, create a support export and send it to support. It can include logs, settings and technical state information.

Summary The whole route is short: download, install, FFmpeg, Ollama, model, setup assistant, short test video. Once this is in place, the product has its basic working foundation, and the next decision is simply the fixed-price personal license.